
The Essential Dashboard for AOSTIR E-Bikes
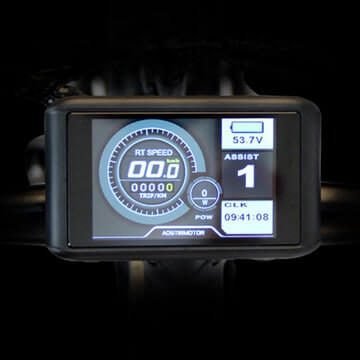
First, the S18 S17 Color LCD Display is the factory-spec dashboard for AOSTIR mountain e-bikes . Whether you own an S18-1500W or S17-1500W model, this display acts as the command center for your 48V system, translating real-time telemetry into an easy-to-read color screen .
Key Features and Readouts
This display provides critical ride data, ensuring you stay informed about your bike’s status :
| Feature | Readout |
|---|---|
| Speed | Current, maximum (MAX), and average (AVG) |
| Power | Battery voltage (V) and remaining power bars |
| Assistance | 0-5 levels of Pedal Assist System (PAS) |
| Distance | Single trip (Trip) and total kilometers (ODO) |
Additionally, the color backlight makes the screen highly visible in direct sunlight .
Plug-and-Play Compatibility
This unit works specifically with the controllers found on high-power AOSTIR models . For proper connection, the display uses a standard Julet waterproof connector – ensure your cable harness matches before purchasing .
Compatibility checklist:
- Voltage: 48V systems (common for 1000W/1500W motors)
- Models: AOSTIR S18-1500W, AOSTIR S17-1500W
- Connector: 4-pin or 5-pin Julet waterproof plug
Display Overview
| Specification | Value |
|---|---|
| Display Type | Color LCD with backlight |
| Operating Voltage | 48V DC |
| Waterproof Rating | IP65 (splash-proof) |
| Backlight Settings | Auto / On / Off |
Adjustable Parameters
You can customize the following settings through the display menu:
| Parameter | Description |
|---|---|
| Wheel Diameter | Calibrate for accurate speed readings |
| Speed Limit | Set maximum assisted speed (up to 99 km/h) |
| Backlight | Brightness and auto-on settings |
| Startup Password | Security protection to deter theft |
Display Readouts Explained
The S18 S17 Color LCD Display shows the following real-time data:
- Current Speed – Your real-time riding speed
- Maximum Speed (MAX) – Highest speed reached during your ride
- Average Speed (AVG) – Your average speed over the trip distance
- Battery Voltage (V) – Precise voltage reading of your 48V battery
- Battery Bars – Visual representation of remaining charge
- PAS Level – Current pedal assist level (0-5)
- Trip Distance – Distance covered since last reset
- Odometer (ODO) – Total accumulated distance over the bike’s lifetime
Installation and Setup
Replacing this display takes only minutes . Follow these steps: disconnect the old unit from the wiring harness, connect the new one, power on the bike, and enter the settings menu .
Calibration steps:
- Power on the display by holding the power button
- Enter the settings menu (usually by holding the up/down buttons)
- Select wheel size and input your tire diameter in millimeters
- Adjust speed limit to your preferred maximum
- Set backlight brightness and auto-off timer
- Enable startup password if desired
Common Error Codes and Their Meanings
Your display will flash error codes (ERR) to help diagnose issues with your e-bike .
Motor Errors:
| Error Code | Meaning |
|---|---|
| Err 03 | Hall sensor fault (motor issue) |
| Err 04 | Motor phase wire issue |
Controller Errors:
| Error Code | Meaning |
|---|---|
| Err 06 | Controller overheating |
| Err 07 | Controller voltage error |
| Err 08 | Controller communication issue |
| Err 09 | Controller communication issue |
Sensor and Brake Errors:
| Error Code | Meaning |
|---|---|
| Err 11 | Temperature sensor error |
| Err 12 | Current sensor error |
| Err 15 | Brake system error |
| Err 21 | Speed sensor error |
Communication Errors:
| Error Code | Meaning |
|---|---|
| Err 30 | Communication failure between display and controller |
Troubleshooting Common Issues
When you encounter Err 03 (Hall sensor fault):
- Check the motor cable connection first
- Inspect the wiring for any visible damage
- Replace the motor if the issue continues after testing
Facing Err 08 or 09 (Controller communication):
- Verify the display connector sits fully in place
- Look for bent pins inside the Julet connector
- Replace the display cable when damage is visible
Dealing with Err 30 (Communication failure):
- Restart the entire system by powering off and on
- Measure battery voltage (should remain above 40V)
- Confirm the controller receives power from the battery
Physical Specifications
| Specification | Value |
|---|---|
| Display Type | Color LCD |
| Backlight | Yes (adjustable) |
| Waterproof Rating | IP65 |
| Connector Type | Julet waterproof (4-pin/5-pin) |
| Operating Voltage | 48V DC |
Who Needs This Display?
The S18 S17 Color LCD Display is perfect for:
- AOSTIR owners with a cracked or malfunctioning original display
- DIY builders replacing a damaged unit after a crash or water exposure
- E-bike mechanics needing an OEM replacement part for repairs
- Riders who want a color display with backlight for better visibility
- Anyone restoring an S18-1500W or S17-1500W to factory condition
Why Choose the Official Display?
In conclusion, the S18 S17 Color LCD Display restores full functionality to your AOSTIR e-bike . Unlike generic displays that may not communicate correctly with your controller, this factory-spec unit ensures proper handshake between the display, battery, and 1500W motor .
Riding in wet weather? The IP65 waterproof rating protects the screen from splashes and rain . Need help troubleshooting? The built-in error code diagnostics help you pinpoint problems quickly, saving time and money on repairs .
For security, adjustable parameters let you set a startup password to deter theft . For visibility, the color screen remains highly readable even in direct sunlight .
When your AOSTIR S18-1500W or S17-1500W needs a replacement display, the S18 S17 Color LCD Display provides the perfect OEM solution.
For more options, browse our Collection of E-Bike Displays or read our E-Bike Troubleshooting Guide to diagnose common issues.tup password to deter theft . The color screen remains highly visible even in direct sunlight .
If your AOSTIR S18-1500W or S17-1500W needs a replacement display, the S18 S17 Color LCD Display provides the perfect OEM solution.
For more options, browse our Collection of E-Bike Displays or read our E-Bike Troubleshooting Guide to diagnose common issues.